 StellarMate OS
StellarMate X OS for Mini PCs
StellarMate OS Bundle
Product Info
StellarMate X OS includes all the software required to operate your equipment provided as an OS Image File (.img) ready to be flashed to your Intel/AMD Mini PC.StellarMate X (SMX) OS 64bit is designed for Mini PCs. StellarMate OS is a complete software package ready for deployment on your Intel/AMD Mini PC. It is provided as a compressed OS Image file (.img.xz) that you can flash to a USB thumb stick and fire it up immediately to enjoy the full benefit of StellarMate software stack. The following packages are included in addition to the base OS:
- INDI
- KStars/Ekos
- Astrometry.net with index files.
- StellarMate Web Manager.
- StellarMate Network Manager.
- StellarMate Serial Port Assistant.
Requirements
- Dedicated Intel/AMD Mini PC with minimum 32GB internal storage, 4GB RAM and WiFi (2.4/5Ghz). StellarMate X will utilize the full disk space. There is no support for partitioning or dual-booting.
- A 16GB+ USB thumb drive to flash the SMX image unto.
- Keyboard + HDMI to initially setup the SMX in the Mini PC.
- If using a DSLR camera, then you must first ensure the camera is supported before you proceed.
Download
After your purchase, you will receieve a link in the email to download the file. Since the file size is ~7GB, it is highly recommended to use a dedicated download manager to download the file. After you download the file, you can verify its integrity by computing its hash. Use Quick Hash GUI to verify the integrity of the image file:
- 64bit StellarMate X OS: StellarMateX_1.8.7.img.xz
- SHA256: 47609e736c449f110f15ec6c359fa54462ae1505514a5d2274409247bbb04e7e
If you need to download StellarMate OS again in the future, make sure you are logged in to the stellarmate.com website and then go to the Orders page. You should see a list of your orders. Click on your order link, then scroll down to see the downloads. Make sure to download the SM OS version appropiate for your hardware platform.
Installation
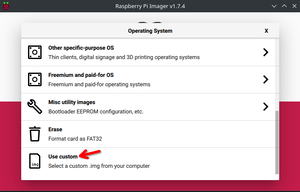
Raspberry PI Imager is a graphical SD card writing tool that works on Mac OS, Linux and Windows, and is the easiest option for most users. It supports writing images directly froma compressed file, without any uncompression required. To flash SM OS image:
- Download Rasbperry PI Imager and install it.

- Insert a 16GB+ USB thumb stick in your Mac/PC.
- Open Raspberry PI Imager and select from your disk the downloaded StellarMate X
.xzimage. - Select the USB thumb stick you wish to write your image to.
- Click WRITE to begin writing data to the USB thumb drive.
Setup
Once the image is flashed to the USB thumb drive, insert the USB stick in your Mini PC and then power it up:
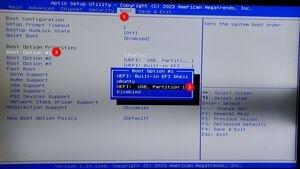
- Tap the appropiate key to enter the BIOS menu. FOr StellarMate X Units, tap the DEL key on the keyboard to enter the BIOS Menu.
- Select Boot menu, then adjust Boot Option #1 so that it boots from the USB thumb stick. Select UEFI: USB, Partition 1
- Go to Save & Exit menu and then confirm saving and exiting the BIOS.
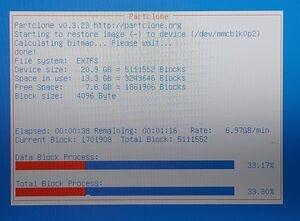
- After the StellarMate X or MiniPC reboots, it should start the restoration process using CloneZilla.
- Select the target disk to install StellarMate X to.
Warning! StellarMate X OS will take the full disk space. All data on the target disk WILL BE COMPETELY WIPED AND IS UNRECOVERABLE. You can not dual-boot or partition the installtion. The Mini PC should be fully dedicated to StellarMate X OS.
- StellarMate X OS installation progress is displayed. Once completed, the Mini PC shall automatically shutdown.
- Remove the USB thumb stick from the Mini PC.
- Power on the Mini PC, and if necessary, enter the BIOS again to change the Boot Option #1 to Ubuntu.
- Reboot the Mini PC and StellarMate X OS should load in about 30 seconds.
Graphics Card Support
- StellarMate X OS is designed for Intel-based graphics. For a headless setup using NVidia/AMD graphics card, you will need to use an HDMI Dummy Plug to properly utilize VNC & Rustdesk for remote access.
- When using an external monitor, sometimes the internal VIRTUAL1 display is not mirrored to the external display. Unplug and replug the HDMI cable to force it to mirror again or restart the mini PC.
Passwords
- The default StellarMate OS password is smate
- The default StellarMate WiFi HotSpot password is stellar@mate
Learning StellarMate
For new users, using StellarMate effectively can take a bit of a learning curve (like everything else) especially given the breadth of the features if provides. Here are some useful resources to get your started:
- First Time Setup tutorial.
- StellarMate Video tutorials.
- Ekos Video Tutorials.
Support
We are proud to offer top-notch support for our customers. Please make sure to check out first the Frequently Asked Questions and Tutorial articles. To report any issues with StellarMate or Ekos, please submit a ticket and our support team should get back to you as soon as possible. Please make sure to submit the relevant logs to aid in diagnosting and resolving the issue efficiently.
Release History
- v1.8.7 Release 2025-02-06
- Updated to INDI Library v2.1.2 and KStars 3.7.5
- Bug fixes and performance improvements.
- v1.8.6 Release 2024-12-16
- Updated to INDI Library v2.1.1 and KStars 3.7.4
- Bug fixes and performance improvements.
- v1.8.5 Release 2024-10-12
- Updated to INDI Library v2.1.0 and KStars 3.7.3
- Bug fixes and performance improvements.
- v1.8.4 Release 2024-08-04
- Updated to INDI Library v2.0.9 and KStars 3.7.2
- Bug fixes and performance improvements.
- v1.8.3 Release 2024-06-05
- Updated to INDI Library v2.0.8 and KStars 3.7.1
- Bug fixes and performance improvements.
- v1.8.2 Release 2024-04-16
- Updated to INDI Library v2.0.7 and KStars 3.7.0
- Bug fixes and performance improvements.
- v1.8.1 Release 2024-02-01
- Updated to INDI Library v2.0.6 and KStars 3.6.9
- WiFi 6 drivers
- Bug fixes and performance improvements.
- v1.8.0 Release 2023-12-29
- Updated to INDI Library v2.0.5 and KStars 3.6.8
- Support for more WiFi drivers.
- Bug fixes and performance improvements.
- v1.7.9 Release 2023-10-01
- Updated to INDI Library v2.0.4 and KStars 3.6.7
- Bug fixes and performance improvements.
- v1.7.8 Release 2023-08-01
- Updated to INDI Library v2.0.3 and KStars 3.6.6
- Bug fixes and performance improvements.
- v1.7.7 Release 2023-06-01
- Updated to INDI Library v2.0.2 and KStars 3.6.5
- Bug fixes and performance improvements.
- v1.7.6 Release 2023-04-06
- Updated to INDI Library v2.0.1 and KStars 3.6.4
- 64bit Intel/AMD support.
- PixInsight XISF format support.
- Bug fixes and performance improvements.
Reviews
Easy Install and very stable so far, love the layout and it has worked flawlessly.Louie Croce


